How To Throw The Shot Put - Step By Step
This is the definitive guide on how to throw the shot put. You'll learn proper technique step by step. If you want to know how to throw the...
We’re going to cover 5 of the most important discus drills for the full throw (otherwise known as the spin).
These drills are incredibly effective for teaching beginners how to throw the discus.
They are equally effective for advanced throwers. This is because they reinforce the correct target positions and help prevent nervous system ruts (bad habits).
The practice progression and discus drills in this guide are an integral part of Brian Bedard’s throwing program at Colorado State University. For over 30 years, his program has produced several All-Americans, National Champions and Olympians.
To get the most out of these drills for discus throwers, they must be performed correctly.
That's why we’ve included video sections from Coach Bedard’s discus throw master class “Throwing Smarter, Throwing Farther.”
You’ll see each of the discus drills step-by-step and in slow motion.
You'll also learn why each drill is important for proper discus technique and how they relate to the throw.
Notes:
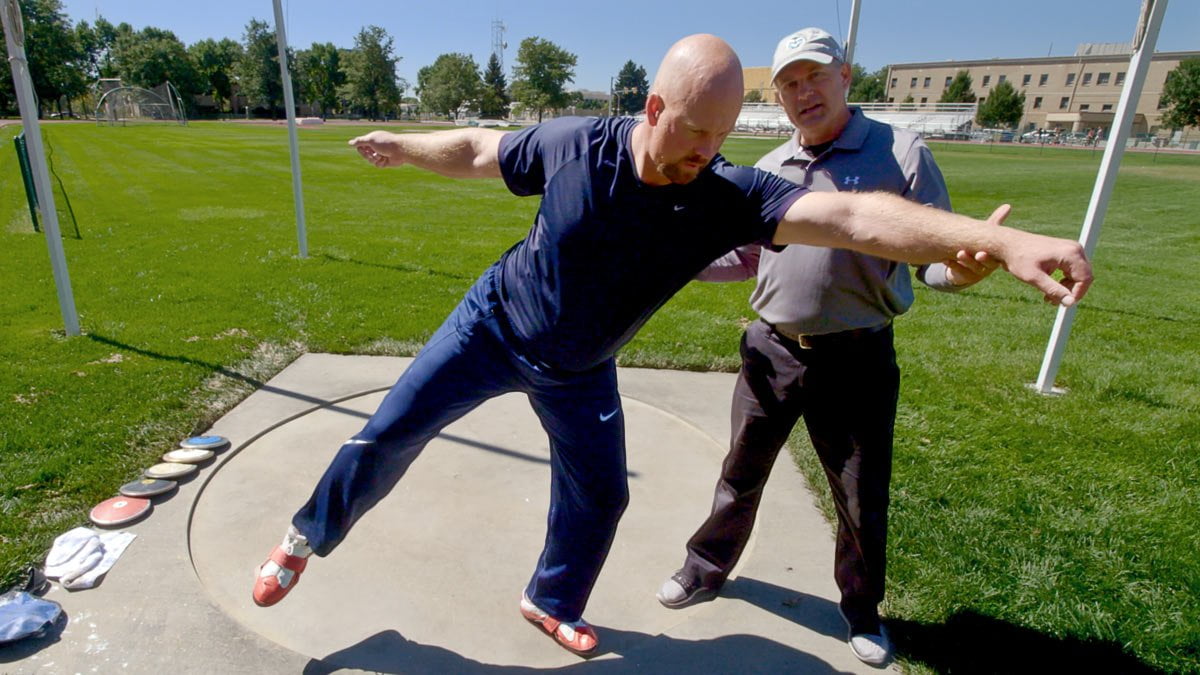
The balanced position is when the thrower has the left armpit over the knee and the knee over the foot. This happens at the back of the ring on the first turn of the throw.
Why is it so important?
Because what a thrower does in the back of the ring will have a massive impact on what they do in the front.
Hitting the correct balanced position enables the thrower to maintain proper posture in the subsequent positions.
It also promotes the proper rhythm of the discus throw. Which is a controlled acceleration throughout the turn.
Successful throwers have great entry mechanics.
In the video below Olympian Casey Malone demonstrates what happens when you fail to hit the balanced position.
Being off balance or in the wrong position at the back of the ring will hurt every single technical element of the discus throw.
Common errors that occur when a thrower has poor entry mechanics include:
The list could go on.
Suffice it to say that the first element of a great throw is being on balance out of the back.
At first glance this drill might seem simple. However, it's at the core of proper discus technique.
A discus thrower should be able to hit the balanced position in their sleep. It needs to be that automatic.
It's worth the time to put the reps in.
Even advanced throwers should continue to train their nervous system by hitting and holding this position.
Watch the video below to see the balanced position drill in action.
Elite discus throwers are in control throughout the entire throw.
Driving or “sprinting” off the back of the ring, in control, and at the right time is paramount.
If a thrower is off-balance on the first turn, they are no longer in control of the throw.
Gravity is.
In the image below, Casey is completely on balance and in control. Notice the wide right leg sweep and position of his upper body.
The 360 pivot turn takes the first discus throw drill one step further. It really develops the ability to rotate on balance so an athlete can drive off the back at the correct moment.
This drill teaches the thrower to keep the upper body from moving ahead of the legs.
This drill also forces the athlete to be aware of the position of their right leg. If it's not wide enough they will typically have trouble completing a full turn.
Tip - it helps to think of driving the left knee down towards the center of the ring to initiate the movement.
Watch the video below to see the 360 pivot turn discus drill in action.
The tap around drill is a great exercise to continue to develop balance and control in the back of the ring.
Many throwers have an issue with impatience in the back of the ring during track meets.
The adrenalin is up, and they want to hit that big throw. This typically leads to a fast or over exaggerated wind.
This causes their body weight to shift off of the left.
They’ll open the throw with their upper body or head and fall to the middle. As soon as the upper and lower body separation is lost, it’s pretty much impossible to get it back.
The chances of delivering a good throw drop to about zero.
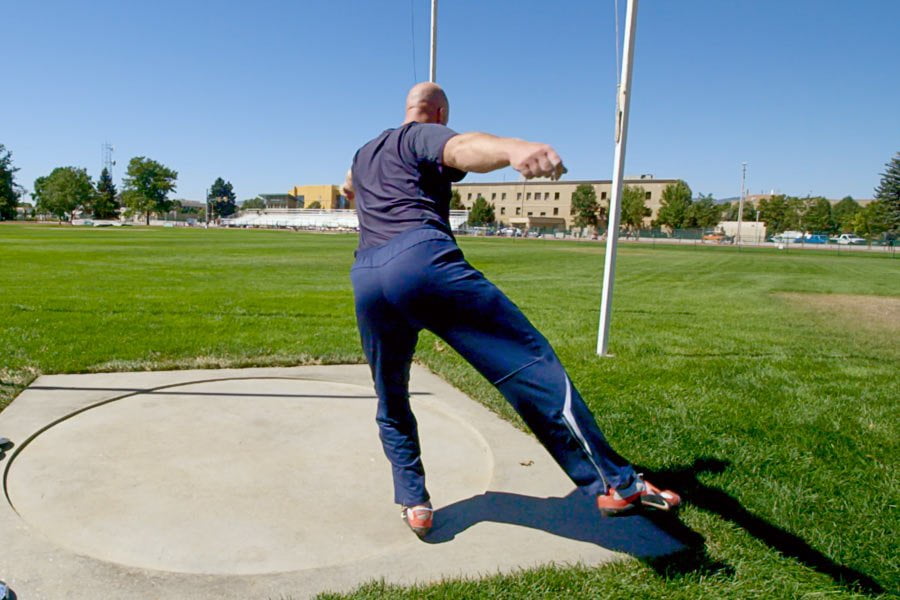
The picture below demonstrates what happens when a thrower leads with the head and upper body.
The athlete immediately begins falling to the middle. The power position at the end of the throw will be completely out of alignment.

That’s why implementing these types of discus footwork drills into your practice routine is so important.
They ingrain the proper technical elements. Often times "rising to the occasion" is actually falling to your level of training.
The tap around drill helps to build patience and reinforce the sensations of hitting the correct pivot turn position (aka step to the middle).
Head and chest up, discus back, correct shin angle and right foot placement etc.
Watch the video below to see the tap around discus drill in action.
This drill combines the first 3 drills and approximates what the first turn should look like in the full throw.
The entire movement should be controlled and fluid. No jerks or sudden acceleration.
The left foot should continue to turn until the right foot touches down.
The lower body starts the movement and leads throughout. The step to the middle should be soft and under control.
As a coach you should be able to hear if the landing is too hard.
The discus arm should remain back with the right shoulder.
Watch the video below to see the fluid movement to the middle drill in action.
Proper discus footwork is something that needs to be second nature. The throw is over in a matter of seconds. You can’t think your way through the movements.
If a thrower hasn’t trained their nervous system to hit the key positions with their feet, it’s going to be very challenging to throw far. That’s why how an athlete practices is just as important as how much.
Simply going out and taking 30 or 40 “hard throws” isn’t going to get it done.
In fact, logging that many reps incorrectly will most likely take the thrower in the opposite direction. Nervous system ruts are difficult to break.
Watch the slow motion discus throw below. Casey Malone's footwork is the result of thousands of hours of practice. Even under the pressure of the Olympics he was able to execute almost perfect footwork.
This is the movement that the fluid turn drill is emulating up until the power position.
The fluid turn drill blends the other 4 drills together. It’s a great tool to dial in discus footwork. Like the previous drills, this one should be performed at a slow and controlled pace.
Athletes can go as slow as they want but they must be on balance and hit the target positions. Speed can be introduced later.
Of course great discus throwers have speed and power. But they also have outstanding balance, footwork and the ability to hit the right positions. The last three items must come first.
Tip - A good cue for the lower body when moving from the pivot turn to the power position is “pinch with the left.”
The left leg should push off and then 'pinch' close to the right. If the left leg swings out wide, it will be slower to get to the front.
A slow left leg causes the upper body to catch up to the lower body. The thrower will lose tension which results in reduced power and distance.
Watch the video below to see the fluid full turn drill in action.
The great thing about all of these drills is they can be performed pretty much anywhere at any time.
If it’s snowing outside, no problem. A gym floor or even a garage will work.
If you are a coach working with several athletes, they are a great way to get a lot of reps in while developing proper technique.
For some of coach Bedard’s throwers, a practice might be 120 fluid turns to the power position. Once they master that, he might add a weighted vest and then eventually a weighted ball or discus.
You can also incorporate this sequence in your warm up prior to taking full throws.
An example would to have throwers perform each drill two times and then take a full throw.
You can customize the sequence and drill selection for specific throwers depending on their needs.
An example could be have an athlete perform two 360 pivot turns prior to every full throw.
If they have issues with landing hard in the middle, it could be 3 turns to the middle before every full throw etc.
In the video below coach Bedard shares some tips on how to implement these discus drills into your practice routine.
Performing drills like the ‘fluid full turn’ isn’t as fun or immediately gratifying as throwing the discus.
But it’s the kind of drill that sets the stage for great performances. If throwers put in the time and repetitions, the results will come.
The hundreds or thousands of hours spent on discus drills suddenly become worth it when a thrower wins a state championship, receives a scholarship or qualifies for the NCAA national championships.
To recap, this video shows you how to put all the discus training drills and technique together.
If you would like to learn more about Coach Brian Bedard's incredibly effective system for learning and coaching elite discus technique, check out his discus throw master class, Throwing Smarter, Throwing Farther.

It's too good
thanks for the tips, as a first year coach I can use all the help I can get. Looking forward to adding the drills to my tool box
You're very welcome Ryan, that's great to hear. If you have any questions or need further assistance as you implement these drills, feel free to reach out. Good luck with your coaching journey, and here's to a successful and rewarding season ahead!
PS. If you haven't already you might want to check out Coach Bedard's Discus master class Throwing Smarter, Throwing Farther, tons of great stuff for coaches.
Thank you I’m 82 tried discus last yr after 66 yr layoff. I’m 5’9” 225 neuropathy in my ft got to 92 ft.( no spin,balance was horrid) Thank you sharing walk thru broken down. I’ll try this again, working on the walk thru spin ,and shoulder strength, and the spring in my feet. Thank you for sharing . Getting the walk thru down was inspiring. Looking forward to another try at it, thank you ,,,,Don
Don, your commitment and enthusiasm are truly inspiring! It's incredible to hear about your return to discus throwing after such a long break, and achieving a throw of 92 feet under those circumstances is remarkable.Keep embracing the process, and I'm excited for you to see how far you can go with another try. Thank you for sharing your story, Don. Keep us updated on your progress!
I've been throwing for 15 years now (74) The 1k is challenging and I have worked at it every year with looking at videos , listening to so called experts, and trying to implement so many changes through the years. Most things did not work well. I was throwing 45m at 60 and at 74 still can hit 40m. Always thinking I can do better because of I stand throw at 38m and can only hit 40m on turn. I now know that the biggest problem was Balance out of the back. My last practice (Feb.11) I simply slowed down kept my hips or mass more under me and felt it on Block. Went 40m and it was pretty easy. Your info was helpful. Jerry
Hello Jerry, that is fantastic to hear (and impressive that you are still throwing at 74!) Your recent insight on the importance of balance out of the back and its positive impact on your throws is spot on. Being balanced and slow out of the back sets up everything. I remember the game-changing moment when I realized that it's not how fast you're moving in the back of the ring, it's how fast the discus is moving during the release. This concept also helps develop a good rhythm to the throw and helps to keep the upper-body behind the lower body. Thank you for sharing your experience and for your kind words about the information provided. Keep pushing the boundaries of what you can achieve, and keep us updated!
Great tips and drills. I’m a volunteer jr and high school coach. I wish I would had this knowledge back when coaching my son. We didn’t do bad he still holds the high school records back in 1989 56’5” and 162’7” and I knew zero. Had a John Powell VHS tape. Once again thanks
That’s awesome! I had the same John Powell VHS tape—the one with the Stanford girl thrower, right? Back then, it was pretty much just that and the Mac Wilkins tape for discus resources—crazy how much has changed. Sounds like you did an incredible job coaching your son, even without all the tools we have now—those records still standing since 1989 say a lot! Glad you found the article helpful, and I really appreciate you sharing your story!
This is great. I am following this on behalf of my 14 year old son who is doing discus throw. Like to know more about discus and i am very thankful if you can share a schedule for him.